Wednesday, December 25, 2013

Play Kitchen


We have been planning an AWESOME christmas present for Kallie and after months of playing on pinterest we JUMPED in! We decided to try our hands at a Vintage inspired kitchen. So I went on a hunt for good bones:) 
This lovely tv stand found at the Salvation Army for $19.99

I also bought a play fridge for $2.99


Kk was so excited to help clean it up even if she had no idea what we had planned.
So hear we go...!  Used 220 grit sand paper to sand everything down. 
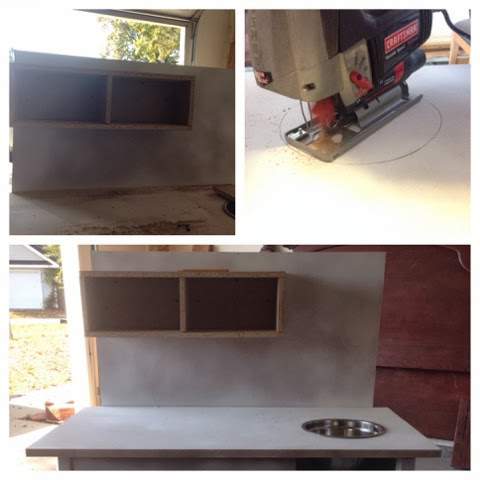
Then remove the top since we were cutting it down to fit our little baker. 

Took the top and back off... yeah at this point I have to admit I was a little nervous.


Had the hubby cut and secure the MDF board to make the back, counter top and oven door.

Primed the body and attached the oven door with hidges from lowes.
Eric and his BFF made the shelf and hole for the sink! {i know they are just adorable..lol and they listen well;) }
Before we did the major painting I spray painted the inside of the oven with the left over Valspar Metallic spray from an older project. YAY for free supplies:)
I choose a light blue by Valspar called Dreamy Clouds. I didn't need a whole lot of paint so I went with two sample sizes, saving money where I can.


Then had a late night paint session with my sister! Yeah I know she is pretty amazing. We knocked out two coats in one night!!


Then next was to install the sink that we got from lowes for $15. Which was a breeze since we pre-drilled the holes before we painted. 
Finally starting to look like a kitchen!! SO Stinkin cute;)
For the stove eyes I traced 4 circles and used regular black acrylic paint.


Omg! Don't you just love it? Sorry for the dark picture we fit in the crafty stuff around real life stuff and since this was from santa kallie was tucked in too. When we try and fit in little things she gets curious and this happens...lol dont judge me!!!
This was in the BARE bones stage so no worries she had no idea:)
We had to accessorize with little gifts that would come with an actual kitchen like canisters. Also a Goodwill find by my sis after i sent her a picture of what i had in mind and she NAILED it!

I also wanted a POP of color on the curtain for under the sink, so we put our heads together! She had TONS of scrap fabric from other random projects that we incorporated.  My idea was color and pleats and she delivered..love her even if she made me man the sewing machine. Remember she's the wiz NOT me but how hard are straight lines?! Oh we cant forget the adorable pot holders and mitt she thru in as part of her present.
We did some finishing touches with the knobs {all working/moving} for the stove, pull/Magnet thing for the oven, and homemade art like the silhouette of the mixer above the sink.
TAH DAHHH!!!! We are ready to set it up and I cant tell you how good that felt after three months of working on and off on this kitchen!


Mimi got in on the fun and got a TON of play food! {LOVE LOVE LOVE} I made some cookies and painted eggs from hobby lobby. She also got pots and pans from Santa of course. A personalized Tea set from her Uncle Alan and Aunt Sana, and a toaster.  
We had a blast toasting, baking, frying! She even told me "I LOVE MY STOVE!!" and my heart melted..seriously made my whole day!  


I hope everyone had a wonderful holiday and keep up the DIY ing it makes life so much more fun;).


Friday, September 27, 2013

Jonathan Adler inspired Initial Pillow!!

I have seen this Inital pillow EVERYWHERE and fell in Love! It's super simple and who doesn't love Jonathan Adler? And it would fit in perfectly on our couch. Then I found it here .....

 Seriously heartbroken at the price, I mean really $125 for a 18x18 pillow. I already imagined having it { but NOT at that price} so I was determined to make it my next small project! I googled "DIY Jonathan Adler inital pillow" and found one awesome blog! Thesouthernstateofmind.blogspot.com . She had everything laid out and easy to follow! I mean this seriously had me excited and I HAD TO MAKE IT!!!!! She DIYed the hell out of this pillow and it ties everything together.


So anything sewing related I beg my sister Michelle to help cuz she pretty awesome and loves projects period. I measured and cut then pinned everything and she took all of a minute or two to sew it!

Super easy we actually made two pillow cases because im going to do one for my daughters room. 

The inital is suppose to be black but I went with marine blue fabric pant, it fit in with the living room better.


Fast forward to a week later when I actually got around to painting..lol. I started taping my border using just a ruler as a guide. 


Now thats done I started my stencil. Using wax paper I cut out the "D" and since I only needed the negative part of the stencil I traced the inside of the D in pencil right on to the pillow case. 


 I ironed the wax paper stencil on to the pillow. Place a piece of fabric between the wax paper and iron to avoid melting the wax paper.


Then paint away! Oh don't forget to put wax paper inside your pillow case so nothing seeps through. I didn't wait of the paint to dry before removing the tape, the sooner the better.


TAA Dahh!! Now just let it sit for the paint to set. 


Stuffed the pillow and sew it up! Then admire your work! Im pretty pleased with my imitation Adler pillow!


Thursday, September 5, 2013

More Spray Paint :) best invention EVER!


After we refinished our dresser we decide to give our Exterior light fixtures a little sprucing up. They have never been replaced and clearly need some attention. You can tell here just how worn out they were.


They obviously needed to be cleaned but after that we (aka the husband did all the work on this one) took the glass out and sprayed! We just bought Brushed Nickel Spray paint by Valspar for knobs on a dresser and it just kinda worked and you cant beat a free project!


So this girl is pretty happy with the cheap route! They look brand new and didnt have to shell out $70 plus per fixture and yes I checked.. That's just crazy.


BEAUTIFUL  and CLEAN exterior fixtures! and again the best invention ever;)

Wednesday, September 4, 2013

Staining

Staining an old Dresser

I have been itching to get my hands on this old dresser! It's my husbands childhood dresser and it's a BEAST..lol Huge, Oak, and Heavy. But doesn't go with anything we have. Now that its found it's way into the Master Bedroom and every time I walk past it I cringe. It has such potential but good God that light wood is horrible.. 
So what better way to spend my last week of vacation than fixing up this guy!

BEFORE


Ohh I should probably share the inspiration for the whole project! I found it on pinterest and fell in love! so ofcourse I stalked..lol jk I went to the blog and here is the link. 


This is finally happening! ok so first time sanding and staining here we go. 
First it looked like this in my garage and all I kept thinking was "Don't be Overwhelmed"..Start by taking off all your knobs.


Then using your sander {borrowed from a friend:)} 220 grit paper go with the grain of the wood. Easy right!! Yeah, not so much.. Lol only because it was like 100 degrees but I got all 8 drawers sanded. THANK GOD!!!
I now had a pretty light wood canvas to start with and was feeling really good about it!


Now your ready to start staining. I used Minwax in Dark Walnut. Make sure you use cloves especially if you are using just the rag {or an old burp cloth.. Don't judge me;)} to apply the stain.


This is just the first coat here and already looking so good! I didn't know what to do with myself for 4 hours until I could apply the second coat. But basketball wives was a good distraction ..lol who wants to fold the laundry anyway!


Second coat looks even better! I was tempted to do a third coat
 But took the husbands advice and let them sit overnight. I'm so thankful I did though because they are the perfect shade, not to dark or to light to go with our bed!


Ok so the next step was to start sanding the actual dresser. Again super thankful we were able to borrow this lifesaver! It made quick work of the not so fun stuff.


And my husband just couldn't stand me having all the fun lol...so he pitched in! Isn't he amazing;)


Finally painting! I chose white paint + primer by Valspar in satin. Using a 4 inch foam roller to apply the paint. 


After three coats it looked PERFECT! So flipping EXCITED, this has been the biggest project we've done in a while and its turning out just how I planned! Now all thats left to do is spray the drawers down with Polyurethane. 


After our last trip to Lowes and talking to the salesperson we decided to use Minwax Fast-Drying Polyurethane Spray. It just seems like the best fit for us, #1 being Fast-Drying #2 Even coverage since we're first timers and all ;).
Spraying was the easy part just make sure you spray 12 inches from your surface in a sweeping motion. Waiting at least two hours in between coats. Then let them sit overnight to dry.


The next day we were so excited to see it complete but almost forgot about the knobs. They were a dark brown/bronze and I couldn't have that..lol. We needed them to be fresh and clean to go with the look of the dresser sooo.. We took one more trip to Lowes. Thank God for spray paint :)!!! 
 

I picked Valspar Metallic brushed nickel color. Which was great because we had another little project we used it on too! But anyway spraying the knobs took no time to do, which was awesome because we were dying to get our NEW baby moved in.

AFTER


Well I must say im pretty proud of this guy! I even got my husbands approval!!! MIND BLOWN. I was a little worried he wouldn't like the white but all is well and our Refinished dresser is fitting in nicely:)  

Price Break Down
Dresser....FREE
Sander .....FREE
Minwax Stain...$8.00
Valspar Paint...$13.98
Minwax Polyurethane...$7.77
Whizz roler kit...$5.97
Valspar Spray Paint...$6.00

Total spent...$41.72 
Love Love Love this! so worth it!